
Technique for Dodge&Burn
Lots of re-toucher's use their own techniques with which they feel comfortable with and in this lesson I will show you a couple of them
First of all I will show you how you prepare your layers with which you will work with and in the second part I will explain what tools you will need to use for specific technique.
Technique NR. 1
Create a new blank layer by pressing keyboard shortcut on MAC shift+cmd+n on PC shift+ctrl+n and it will open a new layer dialog box like you see in the image below.
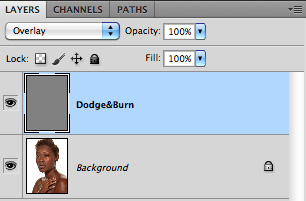
Name the layer Dodge&Burn, and set the blend mode to a contrast blend mode, for D&B I usually use overlay or soft light.

check the box (fill with 50% gray)

Your layer panel should look like this
Technique Nr. 2
The same step create a new layer by pressing on MAC shift+cmd+n on PC shift+ctrl+n name it set the blend mode to overlay or soft light and at this time leave unchecked the dialog box for fill with 50% gray as a show in image below

Your layer panel should look like this

Technique Nr. 3
This technique is a bit more advanced because I will use some adjustments layer to build the set for D&B.
For this set I will use Curves Adj Layer and Hue Saturation Adj layer, so basically I will add a curves adj layer to darken the image and one to brighten the image as I show in the image below.
First for dodge which mean that it will brighten the image and second for burn which will darken the image
First for dodge which mean that it will brighten the image and second for burn which will darken the image
To create an adj layer go to the top menu bar, layers-->New Adj Layer and select from there curves


Now with your cursor set a point in your curves adj layer in midtones range and set the output to 158 and input to 128,
those are not some magical numbers it's just numbers that I use, next to the adj layer you will see a white mask that you will need to make it black by pressing keyboard shortcut on MAC cmd+i on PC ctrl+i which means that will invert your mask from white to black as you can see in the image below.

Next follow the same steps as you did for Dodge the only thing you will need to change is output to 98 because at this point you will need to darken the image.

Now at this point I need to create a clipping adj layer that will effect only the layer below one for Dodge and one for Burn and I will use Hue/Saturation adj layer to desaturate burn and saturate Dodge
Check the image below how your H/S Adj layer should look like.
 For burn set Saturation to -10 because when you burn colors tend to be over saturated.

 For dodge set Saturation to +10 because when you dodge colors tend to lose saturation.
 After I made my adj layers I will set all those adj layers in a Group and call it Dodge&Burn 3
Click on Desat adj layer and shift+click on the dodge adj layer
 Drag it to the bottom right corner in to folder icon to create a Folder(in Photoshop the name is Group)
 As you can see in this image, and name it by double clicking on the name ''Group 1'' and type the name below as you see in the image
 By clicking on the small triangle next to the folder you will reveal the content of your Folder

Check the image below how your H/S Adj layer should look like.
Click on Desat adj layer and shift+click on the dodge adj layer


Now at this point I will explain tools that you will need to use to work your magic on those layers
And I will start with technique NR.1
For this technique I will use Dodge and Burn tool with opacity set to 3% - 6% range set to midtones
For brush I use a soft brush with add noise.
With those setups made I paint on Dadge&Burn layer with dodge to brighten portion of the image and with Burn to darken portion of the image
 And you can get a result like in the image below
 And as you can see from a flat gray layer with dodge&burn tool you can build a three dimensionality.
Now for technique Nr.2 and 3 I use brush and paint on dodge&Burn 2 layer with white to brighten the image and with Black to brighten the image,
For technique Nr. 3 I paint only with white on mask for dodge to brighten the image and for Burn to darken the image.
For brush setup for technique Nr. 2 and 3 I use the same setup as I use for dodge and burn the only thing that is different for brush use is opacity and flow and for opacity I use something between 10-30%and for flow 30%
See images below
 Painted mask
 And in layer panel you can see how the adj layers effect the layer below in this case Background layer with 50% gray fill
 In the final image you can see a painted dodge&burn technique for Nr. 1 using only dodge and burn tools
 And this is the end of my lesson for Dodge and Burn used by me for shaping images and make them look even better.
And I will start with technique NR.1
For this technique I will use Dodge and Burn tool with opacity set to 3% - 6% range set to midtones
For brush I use a soft brush with add noise.
With those setups made I paint on Dadge&Burn layer with dodge to brighten portion of the image and with Burn to darken portion of the image
Now for technique Nr.2 and 3 I use brush and paint on dodge&Burn 2 layer with white to brighten the image and with Black to brighten the image,
For technique Nr. 3 I paint only with white on mask for dodge to brighten the image and for Burn to darken the image.
For brush setup for technique Nr. 2 and 3 I use the same setup as I use for dodge and burn the only thing that is different for brush use is opacity and flow and for opacity I use something between 10-30%and for flow 30%
See images below
Cheers,
Vyacheslav